 Usagi Engine
Usagi Engine
Usagi Engine
Usagi is a 2D game engine for making pixel art games in Lua 5.5. It features live reload, single-command cross-platform export, and a pause menu with input remapping built in.
Usagi is free software made by Brett Chalupa and dedicated to the public domain. Support development of the engine by buying me a coffee.
Links: usagiengine.com, Book, Discord, r/UsagiEngine, Quickstart video, YouTube Playlist
Linux, macOS:
curl -fsSL https://usagiengine.com/install.sh | shWindows (PowerShell):
irm https://usagiengine.com/install.ps1 | iexThe installer fetches the latest release, verifies its SHA-256 checksum,
installs usagi to ~/.usagi/bin/ (or %USERPROFILE%\.usagi\bin\ on Windows),
and adds it to PATH.
Homebrew (package manager):
brew tap brettchalupa/usagi https://codeberg.org/brettchalupa/usagi
brew install usagi
Manual download: Codeberg | GitHub | itch.io
Latest release: v1.2.0.
usagi dev watches your code and assets; saves apply without
losing game state. Tweak a sprite in your editor and see it update instantly.usagi export packages your game for Linux, macOS,
Windows, and the web.sprites.png for textures.Bring your own sound effects, sprite editor, and music tools.
Bootstrap a project and start it in dev mode:
usagi init my_game
cd my_game
usagi dev
init writes main.lua (with _init / _update / _draw stubs),
.luarc.json for Lua LSP support, .gitignore, meta/usagi.lua (API type
stubs), and USAGI.md (a copy of these docs).
Edit main.lua, save, and the running game picks up the change without
restarting or losing state. Drawing "Hello, Usagi!" looks like:
function _draw(_dt)
  gfx.clear(gfx.COLOR_BLACK)
  gfx.text("Hello, Usagi!", 10, 10, gfx.COLOR_WHITE)
endReplace the usagi binary with a newer release, or run usagi update to fetch
the latest. Then run usagi refresh inside a project to refresh the LSP type
stubs and embedded docs (meta/usagi.lua, .luarc.json, USAGI.md). It won't
touch main.lua.
Open an issue for feedback, requests, and bugs. Search first to avoid duplicates.
Usagi is for rapid 2D pixel-art prototyping in Lua. It's a great fit if you want to quickly try out an idea, if you're new to game programming, if you've hit Pico-8's token limit, or if you want something simpler than Love2D.
It is not a fantasy console or a Love2D replacement. It doesn't target mobile or VR, and it isn't built for medium-to-large polished games.
Why Lua: small, widely used in game tooling, and powerful enough to stay out of your way.
An Usagi game is either a single .lua file or a directory with a main.lua in
it. Additional .lua files anywhere under the project root can be loaded with
stock Lua's require. Optional assets live alongside the source code. Here's
what a folder structure could look like for a multi-file project:
my_game/
  main.lua           -- required: your game's entry point
  sprites.png        -- optional: 16×16 sprite sheet (PNG with alpha)
  palette.png        -- optional: custom palette (1px tall, one color per pixel)
  font.png           -- optional: custom font (bake with `usagi font bake`)
  enemies.lua        -- optional: require "enemies"
  data/
    level.json       -- optional: JSON data, loadable with `usagi.read_json("level.json")
    dialog.txt       -- optional: text data, loadable with `usagi.read_text("dialog.txt")
  scenes/
    main_menu.lua    -- optional: require "scenes.main_menu" - source code can be in folders
  sfx/               -- optional: .wav files, file stems become sfx names
    jump.wav
    coin.wav
  music/             -- optional: .ogg/.mp3/.wav/.flac, file stems become track names
    overworld.ogg
    boss.ogg
  shaders/           -- optional: post-process GLSL shaders (advanced; see Shaders)
    crt.fs           -- desktop GLSL 330
    crt_es.fs        -- web + Raspberry Pi GLSL ES 100
Run with:
usagi init path/to/new_game bootstraps a project (main.lua stub,
.luarc.json, .gitignore, LSP stubs, USAGI.md docs).usagi dev path/to/my_game for live-reload development (script, sprites, and
sfx reload on save; Reset re-runs _init).usagi run path/to/my_game to run without live-reload.usagi tools [path] opens the Usagi tools window (jukebox, tile picker). See
the Tools section below.usagi export path/to/my_game packages a game for distribution: zips for
Linux, macOS, Windows, and the web, plus a portable .usagi bundle. See the
Export section below.You can also run Usagi commands without a path to have them run in the current
directory, like usagi dev or usagi export.
Running the binary with no arguments at all (double-clicking it, or launching a
.desktop file) opens a small launcher window. Drop a main.lua or a project
folder onto it and Usagi starts usagi dev on that path.
require "name" resolves to name.lua in the project root, falling back to
name/init.lua if that misses. Dotted names (require "world.tiles") become
slash-separated paths. The same lookup works inside a fused / exported build, so
multi-file projects ship as a single binary or .usagi with no extra config.
Split code into files with require. A module returns its API and is cached, so
require it wherever you need it:
-- player.lua
local Player = {}
function Player.new() return { x = 0, y = 0 } end
return Player

-- main.lua
local Player = require "player"
Use require only, never loadfile / dofile / io to load .lua files:
those read from the OS filesystem, which works in usagi dev but breaks in web
and exported builds. require goes through Usagi's virtual filesystem, so it
works everywhere.
Philosophy: keep it simple, name things clearly, and prefer fixed function signatures.
Style: for Lua, 2 spaces indent with snake_case for locals, function
names, and table fields. SCREAMING_SNAKE_CASE for file-scope constants
(local TICK = 0.12, gfx.COLOR_*). Cross-frame globals are Capitalized.
The canonical game-state container is State, set inside _init. Module
imports kept as globals are Player = require("player"). The shipped
.luarc.json enables lowercase-global, so any unguarded lowercase assignment
at file scope is flagged as an accidental missing local. Engine API (gfx,
input, sfx, music, usagi) stays lowercase and is exempt from the lint
via meta/usagi.lua.
View the Lua 5.5 docs for full language reference.
-- Engine info / config

usagi.GAME_W
usagi.GAME_H
usagi.SPRITE_SIZE
usagi.PLATFORM -- "web" | "macos" | "linux" | "windows" | "unknown"
usagi.IS_DEV
usagi.IS_RELEASE
usagi.elapsed
usagi.measure_text(text)
usagi.save(t)
usagi.load()
usagi.read_json(path) -- read data/<path> as a Lua table
usagi.read_text(path) -- read data/<path> as a string
usagi.to_json(t) -- serialize a Lua table to a JSON string (same shape rules as usagi.save)
usagi.menu_item(label, callback) -- up to 3; callback `return true` keeps menu open
usagi.clear_menu_items()
usagi.toggle_fullscreen() -- flips fullscreen, returns the new state as bool
usagi.is_fullscreen()
usagi.quit() -- terminate the main loop (no-op visually on web)

-- Lifecycle callbacks

_config()
_init()
_update(dt)
_draw(dt)

-- Graphics

gfx.clear(color)
gfx.text(text, x, y, color, alpha?)
gfx.text_ex(text, x, y, scale, rotation, color, alpha)
gfx.rect(x, y, w, h, color, alpha?)
gfx.rect_fill(x, y, w, h, color, alpha?)
gfx.rect_ex(x, y, w, h, thickness, color, alpha?)
gfx.circ(x, y, r, color, alpha?)
gfx.circ_fill(x, y, r, color, alpha?)
gfx.circ_ex(x, y, r, thickness, color, alpha?)
gfx.line(x1, y1, x2, y2, color, alpha?)
gfx.line_ex(x1, y1, x2, y2, thickness, color, alpha?)
gfx.tri(x1, y1, x2, y2, x3, y3, color, alpha?)
gfx.tri_fill(x1, y1, x2, y2, x3, y3, color, alpha?)
gfx.px(x, y, color, alpha?)
gfx.get_px(x, y) -- read screen pixel: r, g, b, palette_index; expensive on web
gfx.spr(index, x, y, alpha?)
gfx.spr_ex(index, x, y, flip_x, flip_y, rotation, tint, alpha)
gfx.get_spr_px(index, x, y) -- read sprite-sheet pixel: r, g, b, palette_index
gfx.sspr(sx, sy, sw, sh, dx, dy, alpha?)
gfx.sspr_ex(sx, sy, sw, sh, dx, dy, dw, dh, flip_x, flip_y, rotation, tint, alpha)
gfx.shader_set(name)
gfx.shader_uniform(name, value)

-- Palette (PICO-8, 16 colors)

gfx.COLOR_BLACK, gfx.COLOR_DARK_BLUE, gfx.COLOR_DARK_PURPLE, gfx.COLOR_DARK_GREEN
gfx.COLOR_BROWN, gfx.COLOR_DARK_GRAY, gfx.COLOR_LIGHT_GRAY, gfx.COLOR_WHITE
gfx.COLOR_RED,   gfx.COLOR_ORANGE,    gfx.COLOR_YELLOW,     gfx.COLOR_GREEN
gfx.COLOR_BLUE,  gfx.COLOR_INDIGO,    gfx.COLOR_PINK,       gfx.COLOR_PEACH

-- Off-palette pure (255,255,255). Identity tint for spr_ex / sspr_ex.
gfx.COLOR_TRUE_WHITE

-- Sound

sfx.play(name)
sfx.play_ex(name, volume, pitch, pan)
sfx.stop(name)
sfx.stop_all()
sfx.is_playing(name)
music.play(name)
music.loop(name)
music.stop()
music.play_ex(name, volume, pitch, pan, loop)
music.mutate(volume, pitch, pan)

-- Input -- actions

input.pressed(action)
input.held(action)
input.released(action)
input.mapping_for(action)
input.last_source()

input.LEFT, input.RIGHT, input.UP, input.DOWN
input.BTN1, input.BTN2, input.BTN3
input.SOURCE_KEYBOARD, input.SOURCE_GAMEPAD

-- Input -- mouse

input.mouse()
input.mouse_over()
input.mouse_held(button)
input.mouse_pressed(button)
input.mouse_released(button)
input.mouse_scroll()
input.set_mouse_visible(visible)
input.mouse_visible()

input.MOUSE_LEFT, input.MOUSE_RIGHT, input.MOUSE_MIDDLE

-- Input -- keyboard (bypasses the action keymap; prefer actions for game input)

input.key_held(key)
input.key_pressed(key)
input.key_released(key)

input.KEY_A   .. input.KEY_Z
input.KEY_0   .. input.KEY_9
input.KEY_F1  .. input.KEY_F12
input.KEY_SPACE, KEY_ENTER, KEY_ESCAPE, KEY_TAB, KEY_BACKSPACE, KEY_DELETE
input.KEY_LEFT, KEY_RIGHT, KEY_UP, KEY_DOWN
input.KEY_LSHIFT, KEY_RSHIFT, KEY_LCTRL, KEY_RCTRL, KEY_LALT, KEY_RALT
input.KEY_BACKTICK, KEY_MINUS, KEY_EQUAL
input.KEY_LBRACKET, KEY_RBRACKET, KEY_BACKSLASH
input.KEY_SEMICOLON, KEY_APOSTROPHE, KEY_COMMA, KEY_PERIOD, KEY_SLASH

-- Effects (juice)

effect.hitstop(time)
effect.screen_shake(time, intensity)
effect.flash(time, color)
effect.slow_mo(time, scale)
effect.stop() -- stop all running effects

-- Util -- math

util.clamp(v, lo, hi)
util.sign(v)
util.round(v)
util.approach(current, target, max_delta)
util.lerp(a, b, t)
util.wrap(v, lo, hi)
util.flash(t, hz)
util.remap(v, start_a, end_a, start_b, end_b)

-- Util -- vectors & geometry
-- table args: vec {x, y}   rect {x, y, w, h}   circ {x, y, r}

util.vec_normalize(vec)
util.vec_dist(vec, vec)
util.vec_dist_sq(vec, vec)
util.vec_from_angle(angle, len)          -- len optional, default 1

util.point_in_rect(vec, rect)
util.point_in_circ(vec, circ)
util.rect_overlap(rect, rect)
util.circ_overlap(circ, circ)
util.circ_rect_overlap(circ, rect)Usagi runs each .lua source through a tiny preprocessor before handing it to
the Lua VM, adding compound assignment sugar:
| operator | rewrite |
|---|---|
+= |
x = x + y |
-= |
x = x - y |
*= |
x = x * y |
/= |
x = x / y |
%= |
x = x % y |
State.score += 1
State.timer += dt
Limitations: the rewrite is line-anchored, so if cond then x += 1 end is left
as-is (use longhand). The LHS is duplicated verbatim, so t[f()] += 1 calls
f() twice.
The included .luarc.json from usagi init declares these as nonstandard
symbols so the lua-language-server does not underline them as syntax errors.
Define any of these as globals for Usagi to call them:
_init() — once at start, and on Reset. Initialize State (and any
other cross-frame globals) here._update(dt) — each frame, before draw. dt is seconds since last frame._draw(dt) — each frame, after update. dt same as above._config() — optional. Called once at startup, before the window opens;
must return a config table._configSupported fields:
name: display name. Drives the window title bar, the macOS .app bundle
directory (Sprite Example.app), the Info.plist CFBundleName /
CFBundleDisplayName, and (after slugging to ASCII kebab-case) the archive
filenames + Linux/Windows binary names produced by usagi export. Defaults to
the project directory name (examples/spr/main.lua → "spr"); falls back to
"Usagi" if no path is available.
pixel_perfect (default false): when true, the game renders at integer
scale multiples only (1×, 2×, 3×, ...) with black letterbox bars filling any
leftover window space. When false, the game scales at any factor that fits
the window while preserving the game's aspect ratio, so bars only appear on
the axis with extra room, never distorting the image. The default is false
because at common fullscreen resolutions (720p, 1080p, 4K) the game's 320×180
native size lands on an integer multiple anyway, and it still looks good in
windowed mode.
game_id: reverse-DNS string like com.brettmakesgames.snake, namespaces
save data and the macOS bundle identifier. Optional.
icon: 1-based tile index into sprites.png, used as the window icon and (on
usagi export --target macos) the .app icon. Optional, defaults to Usagi
bunny.
sprite_size (default 16): side length, in pixels, of one cell in
sprites.png. Drives gfx.spr indexing, the tilepicker tool's grid, and the
window-icon slicer. Your sprites.png must use a multiple of this value on
both axes; the window icon falls back to the default when the layout doesn't
fit. The value also flows into usagi.SPRITE_SIZE so Lua code can read the
active cell size. Optional.
Keep sprites.png within 8192px on each axis. GPUs cap texture dimensions
(usually 16384 on desktop, but often 8192 or less on web and older hardware);
a sheet past the limit uploads clamped, so any sprite sourced beyond it
renders as a black square with no error. If you have hundreds of frames, lay
them out as a grid of rows rather than one very wide row. Usagi logs a warning
at load when a sheet is too large.
game_width (default 320) and game_height (default 180): override the
game's render resolution. The internal render target is sized to these
dimensions; the window upscales to fit, preserving aspect ratio. Tested range
is roughly 320x180 to 640x360. Outside that, the pause-menu and tools UI are
pixel-fixed and may overflow at very small sizes or look sparse at very large
ones. Sprite size (usagi.SPRITE_SIZE, 16) and the bundled font (5x7) don't
scale with the resolution, so a 1280x720 game has tiny sprites and tiny text
relative to the screen. The web export templates the canvas backing-store and
aspect ratio from the configured resolution, so non-16:9 / non-default games
ship correctly with the default shell (no --web-shell needed) and embed
cleanly in itch at any iframe size. Optional.
pause_menu (default true): when true, the engine intercepts Esc / P /
Enter / gamepad Start to open the built-in pause overlay. Set to false and
those keys flow through to user code so the game can roll its own menu with
usagi.menu_item, usagi.toggle_fullscreen, usagi.quit, and the
input.key_* APIs. Disabling also turns off the keyboard remap UI, the Input
Tester, and gamepad-driven menu nav (sub-views of the same overlay), and
usagi.menu_item registrations no longer render. Suitable for keyboard-driven
prototypes. Optional.
initial_fullscreen (default false): when true, the game launches in
fullscreen. This only sets the default for a player's first launch; once they
toggle fullscreen from the pause menu, that saved preference wins on later
launches. Optional.
function _config()
  return {
    name = "Snake",
    pixel_perfect = true,
    game_id = "com.example.snake",
    icon = 1,
    -- game_width = 480,   -- optional; default 320
    -- game_height = 270,  -- optional; default 180
    -- sprite_size = 32,   -- optional; default 16
    -- pause_menu = false, -- optional; default true
    -- initial_fullscreen = true,  -- optional; default false
  }
end
icon (optional) is a 1-based tile index into your sprites.png, same indexing
as gfx.spr. Omitted, the embedded Usagi bunny is used. The chosen tile is
applied to the game window on Linux/Windows. At usagi export --target macos
time the same tile is scaled up and packed into Resources/AppIcon.icns inside
the .app, which is what the macOS Dock/Finder pick up.
_config() runs before the runtime is fully alive (the window doesn't exist
yet), so its return value is read once at startup and cached. Editing
_config() while the game is running won't update the title or any future
config field on save; restart the session to pick up changes.
You don't have to think about window size with Usagi. Your game gets scaled to the window. By default, games launch windowed at about 66% of the display's size, floored to the closest integer scale. Players can toggle fullscreen based on their preference and it's persisted as expected for the next launch. Windows are resizeable by players.
You can set pixel_perfect to true in your _config to ensure your game is
never not pixel perfect. For displays that might be lower res than your game,
your game's window is gets maximized.
If you want your game to launch fullscreen by default, set initial_fullscreen
to true in _config.
gfxDraws to the screen. Positions are in game-space pixels (320×180). Colors are
palette slot indices 1..16; use the named constants.
Every gfx drawing call below takes an optional trailing alpha (opacity in
0..1); omit it or pass 1.0 for a fully opaque draw. This includes text,
spr, and sspr as well as the shape primitives.
gfx.clear(color) — fill the screen.gfx.rect(x, y, w, h, color, alpha?) — 1-pixel rectangle outline.gfx.rect_fill(x, y, w, h, color, alpha?) — filled rectangle.gfx.rect_ex(x, y, w, h, thickness, color, alpha?) — rectangle outline with a
custom stroke thickness in pixels.gfx.circ(x, y, r, color, alpha?) — 1-pixel circle outline centered at
(x, y).gfx.circ_fill(x, y, r, color, alpha?) — filled circle centered at (x, y).gfx.circ_ex(x, y, r, thickness, color, alpha?) — circle outline with a
custom stroke thickness. Stroke is centered on the nominal radius, so stacking
three circ_ex(x, y, r, 1, c) / circ_ex(x, y, r-1, 1, c) /
circ_ex(x, y, r-2, 1, c) calls produces flush concentric rings with no gaps
— fixes the rounding-gap issue you get layering plain gfx.circ calls at
adjacent radii.gfx.line(x1, y1, x2, y2, color, alpha?) — 1-pixel line from (x1, y1) to
(x2, y2).gfx.line_ex(x1, y1, x2, y2, thickness, color, alpha?) — line with a custom
thickness in pixels.gfx.tri(x1, y1, x2, y2, x3, y3, color, alpha?) — 1-pixel triangle outline
from three points. For a thicker outline, draw three gfx.line_ex calls.gfx.tri_fill(x1, y1, x2, y2, x3, y3, color, alpha?) — filled triangle from
three points. Vertex order doesn't matter; the winding is corrected for you so
arrows, spaceship nosecones, and the like just draw regardless of how you laid
out the points.gfx.px(x, y, color, alpha?) — set a single pixel.gfx.get_px(x, y) returns (r, g, b, palette_index) for the pixel at
(x, y) on the most recently rendered frame. palette_index is the 1-based
slot for an exact RGB match or nil for off-palette colors. All four returns
are nil for off-screen coordinates and on the very first frame (before
anything has been drawn). Reads reflect the previous frame's finished image,
so they don't see in-progress draws inside the current _draw. The classic
use is collision-by-color: paint walls into the framebuffer with a known
color, then consult gfx.get_px on the proposed destination in _update.
PERFORMANCE: this function is expensive, in particular on web. It will
slow down your game by ~10% if you call it even just once. Use it with care.gfx.text(text, x, y, color, alpha?) — bundled monogram font (5×7 pixel font,
12 px line height; see Credits below). Renders the engine's default
Latin/Cyrillic/ Greek glyph set, or your custom font if a font.png is
present at the project root (see "Custom fonts" below). To measure text
dimensions, use usagi.measure_text — it lives on usagi rather than gfx
because measurement is a pure utility (no render side-effect) and is callable
from any callback, including _init.gfx.text_ex(text, x, y, scale, rotation, color, alpha) — extended text:scale (number) — font-size multiplier. Use integers (1, 2, 3)
for crisp text since atlas-baked fonts use POINT filtering and integer
scales preserve the pixel-art look. Fractional values blur.rotation (number) — radians. 0 is no rotation. Use math.rad(45) for
literal-degree values. Rotation pivots around the center of the
unrotated bounding box; (x, y) stays the top-left when rotation = 0.
Useful for juice: wiggling subtitles, tilted labels, score popups.alpha (number) — opacity in 0..1. 1.0 is opaque, 0.0 is invisible.
Use for fade-in/out, dimmed UI, ghosted previews.gfx.spr(index, x, y, alpha?) — draw the 16×16 sprite at index (1 =
top-left) from sprites.png. Native size, no flips, no rotation, no tint;
opaque unless you pass alpha.gfx.spr_ex(index, x, y, flip_x, flip_y, rotation, tint, alpha) — extended
spr. All eight args required:flip_x / flip_y (boolean) — mirror left/right or top/bottom.rotation (number) — radians. 0 is no rotation. Use math.rad(45) for
literal-degree values. Rotation pivots around the center of the sprite;
(x, y) stays the top-left of the unrotated bounding box.tint (palette color) — multiplied over the sprite. gfx.COLOR_TRUE_WHITE
is the identity (no recolor). Other colors recolor the sprite (e.g.
gfx.COLOR_RED for a hit flash). Note that gfx.COLOR_WHITE is the Pico-8
palette white (255,241,232), which is slightly warm and will shift
colors a touch; use it intentionally for a paper-aged look, or use
gfx.COLOR_TRUE_WHITE (off-palette pure white) when you want pixels to pass
through unchanged. Multiplicative semantics, so this can't produce a
full-white silhouette: for that, use a shader or draw a colored rect on top.alpha (number) — opacity in 0..1. 1.0 is opaque, 0.0 is invisible.gfx.get_spr_px(index, x, y) returns (r, g, b, palette_index) for a pixel
inside the index sprite cell on sprites.png. index is 1-based (same
shape as gfx.spr); (x, y) is the offset inside the cell, with (0, 0) as
that cell's top-left. All four returns are nil for an out-of-range index,
out-of-cell coordinates, a project with no sprites.png, or a fully
transparent source pixel (gfx.spr draws alpha-keyed, so a transparent pixel
reads as "nothing here" rather than as its backing RGB). Unlike gfx.get_px,
sprite reads are deterministic and unaffected by draw order: useful for
pixel-perfect sprite collision and for levels where you paint the layout into
the sheet and scan it at startup to spawn entities.gfx.sspr(sx, sy, sw, sh, dx, dy, alpha?) — draw an arbitrary
(sx, sy, sw, sh) rectangle from sprites.png at (dx, dy) at original
size; opaque unless you pass alpha.gfx.sspr_ex(sx, sy, sw, sh, dx, dy, dw, dh, flip_x, flip_y, rotation, tint, alpha)
— extended sspr: stretches to (dw, dh), flips per the booleans, then
rotates / tints / sets alpha. Same semantics as spr_ex. All thirteen args
required.gfx.COLOR_BLACK, COLOR_DARK_BLUE, COLOR_DARK_PURPLE, COLOR_DARK_GREEN,
COLOR_BROWN, COLOR_DARK_GRAY, COLOR_LIGHT_GRAY, COLOR_WHITE,
COLOR_RED, COLOR_ORANGE, COLOR_YELLOW, COLOR_GREEN, COLOR_BLUE,
COLOR_INDIGO, COLOR_PINK, COLOR_PEACH — palette slot indices 1..16,
matching gfx.spr and Lua's array convention. The RGB at each slot is the
default Pico-8 palette unless a palette.png overrides it (see below). The
constants are slot indices, not RGB promises: if you swap palettes,
gfx.COLOR_RED still resolves through slot 9, but its actual color depends on
the active palette.gfx.COLOR_TRUE_WHITE — slot 0, pure (255, 255, 255). Off-palette: stays
pure white even when a palette.png is loaded. Use as the identity tint for
gfx.spr_ex / gfx.sspr_ex when you want sprites to draw with their source
colors untouched. The Pico-8 gfx.COLOR_WHITE is slightly warm
(255, 241, 232) and will tint sprites a touch peachy if you pass it as the
tint, fine if you want that look, but gfx.COLOR_TRUE_WHITE is the no-op.
(Indices below 0 or above the active palette's length render as magenta as
an obvious "unknown color" sentinel.)The _ex variants pack every power-arg into one fixed signature instead of
trailing optionals. With a single _ex per primitive there's exactly one
decision per draw ("simple or extended?"). If you want shorter call sites, write
a thin wrapper.
palette.png)Put a palette.png at your project root to override the engine's default Pico-8
palette. Pixels are read in row-major order (left-to-right, top-to-bottom):
width × height. Multi-row is fine for
organizing larger palettes.gfx.COLOR_*
constants are 1..16 slot indices into the active palette.Behavior:
palette.png → engine uses the Pico-8 default (16 colors).sprites.png. Save a new palette.png over the old one and
the running game flips colors immediately.255,0,255,255) —
the existing "unknown color" sentinel. If your palette has 8 colors,
gfx.COLOR_RED (slot 9) and higher will be magenta. Define your own constants
in Lua for non-default palettes.usagi export automatically when present.Recommended pattern: name your own slots when using a custom color palette.
The built-in gfx.COLOR_* constants are named after Pico-8's slot ordering
(slot 9 = COLOR_RED). With a custom palette, slot 9 might be a navy blue or a
teal. The names don't match the colors anymore. Define your own constants once
at the top of your project and use them everywhere:
-- e.g. for sweetie16
local COLOR = {
  NIGHT = 1, PURPLE = 2, RED = 3,    ORANGE = 4,
  YELLOW = 5, LIME = 6,  GREEN = 7,  TEAL = 8,
  NAVY = 9,  BLUE = 10,  SKY = 11,   CYAN = 12,
  WHITE = 13, SILVER = 14, GRAY = 15, SHADOW = 16,
}

gfx.clear(COLOR.NIGHT)
gfx.rect_fill(x, y, w, h, COLOR.RED)
Workflow tip: palette.png loads directly into Aseprite's palette panel with
one click ("Edit → Preferences → Palette → Load"), so the same file drives both
your engine colors and the swatches you paint with.
See
examples/palette_swap
for a runnable demo (ships sweetie16, uses a COLOR table for its named slots).
font.png)Put a font.png at your project root to override the bundled monogram font used
by gfx.text / gfx.text_ex / usagi.measure_text. The PNG is a baked glyph
atlas with metadata embedded as a zTXt chunk (see "Baking" below).
Scope of the override is intentionally narrow:
gfx.text or
gfx.text_ex.The font's natural line height drives usagi.measure_text and the per-glyph
positioning, so a smaller custom font (e.g., Misaki Gothic 8×8) renders at 8 px
and a larger one (Silver 5×9) renders at 21 px, both crisp at integer scales.
Baking a font:
usagi font bake <font.ttf> <size>Examples:
# Drop into the current project (writes font.png in current working directory by default)
usagi font bake my_font.ttf 12

# Skip the kanji block for a font that covers it
usagi font bake misaki_gothic.ttf 8 --scripts all,-cjk

# Korean-only atlas (smaller output for a game that doesn't need other scripts)
usagi font bake silver.ttf 18 --scripts latin,latin-ext,punct,korean

# Write to a specific path
usagi font bake silver.ttf 18 --out my_proj/font.png
Behavior:
15, Silver at 18, Misaki Gothic at 8, Geist Pixel at
16.--scripts to narrow or expand the set. Pass a comma-separated list of
names; all (default) and none are special values, and a - prefix
subtracts. Known names: latin, latin-ext, greek, cyrillic, punct,
arrows, math (alias: math-ops), box-drawing (alias: box),
geometric (alias: shapes), symbols (alias: misc-symbols), cjk-punct,
hiragana, katakana, hangul (alias: korean), cjk (alias: han),
halfwidth. Examples: --scripts all,-cjk to drop the Han ideographs (~21k
codepoints), or --scripts latin,korean for a focused atlas. The
arrows/math/box-drawing/geometric/symbols blocks add only a few KB when the
font covers them; subtract any you don't need (e.g. --scripts all,-symbols).--no-cjk is a deprecated alias for --scripts all,-cjk. It still works but
prints a warning and will be removed in a future major release.font.png with metadata in a zTXt chunk. Drop it next to
your main.lua and the engine picks it up automatically.Behavior of the project drop-in:
font.png → engine uses the bundled monogram font (current default).usagi export automatically when present.Asian-language support: the bundled monogram font covers Latin / Cyrillic / partial Greek but no CJK. For Japanese, Chinese, or Korean text, grab a pixel font that covers the scripts you need and bake it:
# Silver: 5x9-ish with broad European + ~8k CJK ideographs + ~2k Hangul.
# Download from https://poppyworks.itch.io/silver (CC-BY-4.0).
usagi font bake Silver.ttf 18
# Drop the resulting font.png next to your project's main.lua.
See
examples/custom_font
for a working Silver-based demo that renders English, Cyrillic, Greek, Japanese,
and Korean on the same screen.
There's no scale param on spr / spr_ex as those are fixed at the native
sprite size. To draw a sprite scaled, use sspr_ex with a destination size that
differs from the source size:
-- Draw sprite index 1 (16×16) at 2x scale at (x, y).
local sz = usagi.SPRITE_SIZE
gfx.sspr_ex(0, 0, sz, sz, x, y, sz * 2, sz * 2, false, false, 0, gfx.COLOR_TRUE_WHITE, 1.0)
If you find yourself reaching for variants often, wrap them. These three helpers cover most games:
-- Scaled draw of a source rect on the sheet. Doesn't go through `spr`
-- indexing — pick the source rect yourself with the TilePicker.
function sspr_scaled(sx, sy, sw, sh, dx, dy, scale)
  gfx.sspr_ex(
    sx, sy, sw, sh,
    dx, dy, sw * scale, sh * scale,
    false, false, 0, gfx.COLOR_TRUE_WHITE, 1.0
  )
end

-- Sprite by 1-based index with rotation around its center, native size.
function spr_rot(index, x, y, rotation)
  gfx.spr_ex(index, x, y, false, false, rotation, gfx.COLOR_TRUE_WHITE, 1.0)
end

-- Sprite by 1-based index with a tint applied, native size.
function spr_tinted(index, x, y, tint)
  gfx.spr_ex(index, x, y, false, false, 0, tint, 1.0)
end
The engine intentionally doesn't ship these as every game has slightly different conventions (whether scale should be integer-only, whether rotation centers somewhere other than the middle, whether tinted draws also need alpha), and forcing one shape on everyone hurts more than it helps. Copy and adapt.
inputAbstract input actions. Each action is a union over keyboard, gamepad buttons, and the left analog stick; any connected gamepad fires every action, so the Steam Deck's built-in pad and an external pad both work, and hot-swapping is transparent.
input.pressed(action) — true only the frame the action first went down. Use
for one-shot actions (fire, jump, menu select).input.held(action) — true while the action is held. Use for movement,
charging meters, "hold to skip" prompts.input.released(action) — true only the frame the action first went up. Use
for charge-and-release mechanics (jump-on-release, slingshot pull-back).| Action | Keyboard | Gamepad |
|---|---|---|
LEFT |
arrow left / A | dpad left / left stick left |
RIGHT |
arrow right / D | dpad right / left stick right |
UP |
arrow up / W | dpad up / left stick up |
DOWN |
arrow down / S | dpad down / left stick down |
BTN1 |
Z / J | south face (Xbox A, PS Cross), LB |
BTN2 |
X / K | east face (Xbox B, PS Circle), RB |
BTN3 |
C / L | north + west face (Xbox Y/X, PS Triangle/Square) |
BTN1/BTN2/BTN3 are abstract action buttons. BTN3 binds both the north and
west face buttons because either is easier to reach than crossing the diamond
from BTN1's south position.
Nintendo Switch face-button swap. When a Switch pad is connected, BTN1 fires
from the A button (east face) and BTN2 from the B button (south face), matching
Nintendo's "A confirms, B cancels" convention. Triggers (L/R) and BTN3 are
unchanged. The swap is automatic via GetGamepadName; from your game's
perspective input.pressed(input.BTN1) still means "primary action."
input.pressed and input.released are edge-detected across keyboard, gamepad
buttons, and analog sticks. Tilting the stick past the deadzone fires a single
press the frame it crosses; releasing fires the frame it falls back inside.
For UI prompts that adapt to the device the player is using:
input.mapping_for(action): string label of the active source's primary
binding for action (e.g. "Z" on keyboard, "A" on Xbox, "Cross" on
PlayStation, "A" on Switch since Nintendo swaps BTN1 to its A button).
Gamepad family is auto-detected via GetGamepadName. Honors any keymap remap
the player has set via the pause menu's Configure Keys flow. Returns nil if
action is unknown or the active source has no binding for it (rare; only
after exotic remaps).input.last_source(): string "keyboard" or "gamepad", the source that
most recently fired any bound action. Switches only when a bound input
fires, so menu keys (Esc/Enter) and idle activity don't flip it.input.SOURCE_KEYBOARD, input.SOURCE_GAMEPAD: the corresponding string
constants for comparing against last_source().local btn = input.mapping_for(input.BTN1) or "?"
gfx.text("Press " .. btn .. " to jump", 10, 10, gfx.COLOR_WHITE)input.mouse() — returns x, y for the cursor in game-space pixels (so the
values line up with gfx.* coords regardless of window size or pixel-perfect
scaling). When the cursor sits over the letterbox bars the values fall outside
0..usagi.GAME_W / 0..usagi.GAME_H, so a bounds check is the idiomatic way
to detect "cursor is off the play area." See
examples/mouse.
input.mouse_over() — true when the cursor is over the drawn game area; false
when it's outside the window or over the letterbox bars.
input.mouse_held(button) — true while button is held.
input.mouse_pressed(button) — true the frame button first went down.
input.mouse_released(button) — true the frame button first went up.
input.mouse_scroll() — per-frame vertical scroll delta. Returns a number:
positive when scrolled up this frame, negative when down, 0 when no scroll.
Works the same on a mouse wheel and on a trackpad two-finger swipe. Match on
> 0 / < 0 rather than == 1 since trackpads emit fractional values:
local s = input.mouse_scroll()
if s > 0 then slot = math.max(1, slot - 1) end
if s < 0 then slot = math.min(N, slot + 1) endinput.MOUSE_LEFT, input.MOUSE_RIGHT, input.MOUSE_MIDDLE — the supported
buttons.
input.set_mouse_visible(visible) — show or hide the OS cursor over the game
window. Callable from _init to hide the cursor before the first frame draws
(handy for games that render their own cursor sprite).
input.mouse_visible() — true when the OS cursor is currently shown. Reflects
the latest set_mouse_visible call synchronously, so toggling reads
consistently: input.set_mouse_visible(not input.mouse_visible()).
For dev hotkeys (toggling debug overlays, screenshotting, F-key shortcuts) and for keyboard-and-mouse-only games, you can read raw keyboard state by key:
input.key_pressed(key) — true the frame key first went down.input.key_held(key) — true while key is held.input.key_released(key) — true the frame key first went up.if usagi.IS_DEV and input.key_pressed(input.KEY_F1) then
State.show_debug = not State.show_debug
endUse sparingly for gameplay. These bypass the action/keymap system on
purpose, meaning they don't honor the player's pause-menu key remaps and they
don't fire from a gamepad. Anything a player should be able to remap, or that a
controller player needs to reach, belongs on input.held / input.pressed /
input.released with an abstract action.
Available constants (all input.KEY_*): letters A–Z, digits 0–9,
function keys F1–F12, SPACE, ENTER, ESCAPE, TAB, BACKSPACE,
DELETE, arrows (LEFT, RIGHT, UP, DOWN), modifiers (LSHIFT, RSHIFT,
LCTRL, RCTRL, LALT, RALT), and punctuation (BACKTICK, MINUS,
EQUAL, LBRACKET, RBRACKET, BACKSLASH, SEMICOLON, APOSTROPHE,
COMMA, PERIOD, SLASH). Numpad and the navigation cluster
(Insert/Home/End/PgUp/PgDn) aren't exposed.
Raw gamepad reads (analog sticks, triggers, individual face buttons by index)
are intentionally not exposed. The abstract input.held(input.BTN1) family
covers gamepad input; if you need finer-grained control than that, you've likely
outgrown Usagi. Fork the engine or use Love2D!
sfxsfx.play(name) — play sfx/<name>.wav. Unknown names silently no-op. Each
sfx has a pool of 8 voices that overlap; the 9th simultaneous play steals the
oldest.sfx.play_ex(name, volume, pitch, pan) — fire-and-forget with per-call
params. Useful for varied one-shot effects without needing to commit extra
.wav files. All three params required:volume (number) — 0..1 multiplier on the pause-menu sfx volume. 1.0 is
identity. Clamped.pitch (number) — pitch multiplier. 1.0 is identity, 0.5 is an octave
down, 2.0 is an octave up. Useful with math.random for varied footsteps
/ coin pickups from a single .wav.pan (number) — stereo pan, -1..1. -1 left, 0 center, 1 right.
Clamped.sfx.stop(name) — stop every playing voice of name. Unknown or idle names
silently no-op.sfx.stop_all() — stop every voice of every loaded sfx.sfx.is_playing(name) — true if any voice of name is currently playing,
false for unknown or idle names.musicBackground music streamed from disk (or the fused bundle). Only one track plays
at a time; calling play, loop, or play_ex while another is playing stops
the old one first.
music.play(name) — play music/<name>.<ext> once and stop at the end.music.loop(name) — play and loop forever.music.stop() — stop whatever's playing. No-op if nothing is.music.play_ex(name, volume, pitch, pan, loop) — play with explicit initial
params. loop is a boolean (true to loop forever, false to play once).
The other params follow sfx.play_ex. The chosen volume / pitch / pan become
the initial values that subsequent music.mutate calls modulate from.music.mutate(volume, pitch, pan) — modulate the currently playing
track's params in place. Replace semantics: each call sets the absolute
values, no stacking. No-op when nothing is playing. Use this for ducking music
under dialogue, pitch-warping during hitstun, and fade-outs on death. Volume /
pitch / pan ranges match sfx.play_ex. The engine doesn't expose getters by
design. Track values in your own game state if you want to tween (see
examples/music).All four play / loop / stop / play_ex calls are callable from _init, so a
title track can start the moment the window opens (no one-frame gap waiting for
_update).
Recognized extensions: .ogg, .mp3, .wav, .flac. OGG is recommended for
music as they're small and cross-platform.
The file stem is the name; music/intro.ogg is music.play("intro"). Music
lives in a separate directory from sfx because the formats and lifetimes differ
— sfx is loaded fully into memory and one-shotted, music is decoded
incrementally on the audio thread.
utilDrop-in math and geometry helpers. Pure Lua, no engine state, available as a
global util table.
Functions taking shaped tables (vectors {x, y}, rects {x, y, w, h}, circles
{x, y, r}) check their args and raise an error pointing at your call site
when a field is missing, so a typo like util.rect_overlap({x=0, y=0, w=10})
fails with util.rect_overlap: arg 1 table missing or non-numeric field 'h'
instead of a confusing nil-arithmetic explosion deep inside the helper.
Scalar math:
util.clamp(v, lo, hi) — clamps v into [lo, hi].util.sign(v) — returns -1, 0, or 1. Lua doesn't have this built-in.util.round(v) — half-up rounding to nearest integer. Pixel-snap world
positions on draw to keep sprites crisp.util.approach(current, target, max_delta) — moves current toward target
by at most max_delta. Pass a delta scaled by dt for frame-rate
independence (util.approach(p.vx, target, accel * dt)).util.lerp(a, b, t) — linear interpolation; t = 0 → a, t = 1 → b,
values outside [0, 1] extrapolate.util.wrap(v, lo, hi) — wraps v into [lo, hi). Cycle-safe for negatives.util.flash(t, hz) — boolean from time, toggles hz times per second.util.remap(v, start_a, end_a, start_b, end_b) — maps v from
[start_a, end_a] to [start_b, end_b].Vectors: all take {x, y} tables and are pure (inputs never mutated).
util.vec_normalize(v) — v is an {x, y} vector. Returns a new unit-length
{x, y}. Zero in → zero out (no divide-by-zero).util.vec_dist(a, b) — straight-line distance between points a and b,
each an {x, y} table.util.vec_dist_sq(a, b) — squared distance between {x, y} points a and
b. Skips the sqrt for "is X closer than Y?" hot loops; compare against
r * r.util.vec_from_angle(angle, len) — angle in radians, len the magnitude
(optional, default 1). Returns an {x, y} vector. Pair with
math.atan(dy, dx) to convert a direction into a velocity.Geometry overlap: table args are points/vectors {x, y}, rects
{x, y, w, h} (top-left origin), and circles {x, y, r} (center + radius). All
return a boolean.
util.point_in_rect(p, r) — is point p {x, y} inside rect r
{x, y, w, h}? Half-open [x, x+w) on each axis: top/left edges count as
inside, bottom/right as outside.util.point_in_circ(p, c) — is point p {x, y} inside circle c
{x, y, r}? Boundary counts as outside (matches circ_overlap).util.rect_overlap(a, b) — do rects a and b ({x, y, w, h}) overlap?
AABB test; edge-adjacent rects don't overlap.util.circ_overlap(a, b) — do circles a and b ({x, y, r}) overlap?
Tangent circles don't overlap.util.circ_rect_overlap(c, r) — does circle c {x, y, r} overlap rect r
{x, y, w, h}? Closest-point method.usagiEngine-level info.
usagi.GAME_W, usagi.GAME_H — game render dimensions (320, 180).
usagi.SPRITE_SIZE — side length, in pixels, of one cell in sprites.png
(default 16, set via _config().sprite_size). Use it for tile-grid math
instead of hardcoding 16:
gfx.spr(idx, col * usagi.SPRITE_SIZE, row * usagi.SPRITE_SIZE).
usagi.IS_DEV — true when running under usagi dev; false under
usagi run and inside exported binaries. Useful for gating debug overlays,
dev menus, verbose logging:
if usagi.IS_DEV then
  gfx.text("debug", 0, 0, gfx.COLOR_GREEN)
end
usagi.IS_RELEASE — the inverse of usagi.IS_DEV. Reads nicer than
not usagi.IS_DEV when gating release-only code.
usagi.elapsed — wall-clock seconds since the session started, updated once
per frame before _update. Frame-stable (every read in one frame returns the
same value). Survives Reset; track your own counter from _init if
you need a per-run timer.
usagi.measure_text(text) — returns two values, width, height in pixels,
for text rendered in the bundled font. Pure utility (no rendering); call it
from _init to pre-compute layouts, or from _update / _draw for dynamic
strings.
local w, h = usagi.measure_text("Game Over")
gfx.text("Game Over", (usagi.GAME_W - w) / 2, (usagi.GAME_H - h) / 2,
         gfx.COLOR_WHITE)
usagi.save(t) — serialize a Lua table as JSON and persist it. Saves are
per-game (namespaced by game_id in _config()) so games made with usagi
don't clobber each other.
usagi.load() — return the previously saved table, or nil on first run.
function _config()
  return { name = "My Game", game_id = "com.you.mygame" }
end

function _init()
  State = usagi.load() or { score = 0, best = 0 }
end

function _update(dt)
  -- ... gameplay updates State.score, State.best ...
  usagi.save(State)  -- call whenever you want to persist
end
Save data is one JSON file. Nest your own structure inside it (settings, unlocks, run state). There are no slots at the engine level.
Where saves live:
~/.local/share/<game_id>/save.json~/Library/Application Support/<game_id>/save.json%APPDATA%\<game_id>\save.jsonlocalStorage, key usagi.save.<game_id>game_id is a reverse-DNS string like com.brettmakesgames.snake. It's
required for save / load but optional for games that never persist anything.
Native writes are atomic (save.json.tmp + rename), so a crash mid-write
leaves the previous save intact. JSON values must be representable: tables,
strings, numbers, booleans, nil. Functions, userdata, NaN, and circular tables
raise an error.
Table keys must be either all strings (a map) or a dense 1..n integer
array. JSON has no integer-keyed map type, so sparse integer keys like
{[6]=1, [7]=2} and gaps like {[1]="x", [3]="z"} raise a clear error
instead of silently truncating. If you want a map indexed by integers,
stringify the keys ({[tostring(level)] = time}); if you want a list, fill
1..n.
Drop arbitrary game data (levels, dialog, tunable configs) under a data/
directory at your project root. usagi export bundles the whole tree, so the
same paths resolve identically in dev and in exported builds.
usagi.read_json(path) — reads data/<path> as JSON and returns a Lua table.
JSON arrays come back as 1-indexed Lua arrays; JSON objects come back as
tables with string keys. Errors loudly on malformed JSON, missing file, or
non-UTF-8 bytes.usagi.read_text(path) — reads data/<path> as a UTF-8 string. Use for
hand-rolled formats: CSV grids, dialog scripts, anything you want to parse
yourself in Lua.Paths are forward-slash relative to data/. Nested subdirs are fine
(data/levels/01.json → usagi.read_json("levels/01.json")). Backslashes,
absolute paths, and .. segments are rejected at the vfs boundary so a
malicious or buggy path can't escape data/.
function _config()
  return { name = "Tile Demo" }
end

-- Read at the top of the chunk so live reload picks up edits to the JSON
-- without needing F5. The script re-runs whenever any data file mtime
-- changes, the same way it does for any .lua file.
local levels = usagi.read_json("levels.json")
local intro  = usagi.read_text("dialog/intro.txt")

function _draw(_dt)
  gfx.clear(gfx.COLOR_BLACK)
  gfx.text(intro, 4, 4, gfx.COLOR_WHITE)
  -- ... iterate `levels` ...
end
Hot reload: any save to a file under data/ triggers the same script re-run
that a .lua save does. State globals (capitalized vars set in _init) are
preserved across reloads; if you want a true reset, press F5. Bundled builds
have no mtimes, so hot reload is a dev-only convenience; exported games read
once from the bundle.
For CSV, use read_text + Lua splitting. A 3-line string.gmatch covers the
simple-grid case (see examples/level_from_csv/).
usagi.to_json(t) returns a pretty-printed JSON string for any Lua table. It
shares the validator with usagi.save, so the same shape rules apply: keys are
all strings or a dense 1..n integer array; functions, userdata, NaN, and
cycles raise an error with a clear message.
Useful when you want JSON without going through the save file: in-game devtools
overlays, structured stdout logs, ad-hoc state inspection, or feeding data into
another tool. Pair with usagi.read_json if you ever want to round-trip; reach
for usagi.dump instead when you want a Lua table you could require or
forgiving pretty-print that tolerates cycles and mixed-key tables.
local payload = { score = 200, run = { seed = 42, deaths = 1 } }
print(usagi.to_json(payload))
-- {
--   "score": 200,
--   "run": { "seed": 42, "deaths": 1 }
-- }
See examples/to_json.lua for a runnable demo.
The effect.* module gives you four engine-level juice primitives. Each is a
single call from anywhere in _init / _update / _draw; the engine decays
them once per frame and threads them into the right point in the update / render
loop, so you don't have to plumb shake offsets through your draws or gate
_update on a freeze flag.
effect.hitstop(0.06)                     -- freeze _update for 60 ms
effect.screen_shake(0.3, 4)              -- shake 0.3 s, up to 4 game pixels
effect.flash(0.1, gfx.COLOR_WHITE)       -- white flash, fades over 100 ms
effect.slow_mo(1.5, 0.3)                 -- 1.5 s at 30% speed
effect.hitstop(time) skips the call to _update for time seconds.
_draw still runs so the world stays on screen.effect.screen_shake(time, intensity) offsets the RT-to-window blit.
intensity is a max offset in game pixels (try 2-6); the magnitude decays
linearly to zero. Overlays drawn outside the world (the engine error overlay,
the REC indicator) stay anchored.effect.flash(time, color) draws a full-screen overlay of palette color
on top of _draw's output. Alpha decays from opaque to transparent. White on
hits, red on damage.effect.slow_mo(time, scale) multiplies the dt passed to _update by
scale. scale=0.5 is half-speed, scale=2.0 is double-speed, scale=0
freezes (use effect.hitstop for that intent). The slow_mo timer itself
counts down at real wall-clock, so the cinematic always ends on schedule.effect.stop() ends all currently running effects; useful when
transitioning between scenes or states in your game.Stacking. Across all four, longer duration wins; for the magnitude
parameter, the latest call wins. effect.screen_shake(0.1, 2) followed by
effect.screen_shake(0.5, 4) gives 0.5 s at intensity 4. Spam-calling is safe.
Pause. When the engine pause overlay is open, effect timers don't tick and shake is suppressed under the "PAUSED" view, so nothing decays or rattles while the game is held.
See
examples/effect.lua
for a runnable demo (one key per primitive plus a combo button).
Post-process GLSL fragment shaders run as the final pass when the game's render target is blitted to the window. Use them for CRT effects, palette swaps, vignettes, color grading, and so on.
Captures have a known limitation (see below).
API:
gfx.shader_set("name"): activate shaders/<name>.fs (and an optional
shaders/<name>.vs).gfx.shader_set(nil): clear the active shader.gfx.shader_uniform("u_name", v): queue a uniform write. v may be a number
(float) or a 2/3/4-length numeric table (vec2/vec3/vec4). Call this every
frame inside _update or _draw for animated values.function _init() gfx.shader_set("crt") end
function _draw(_dt)
gfx.shader_uniform("u_time", usagi.elapsed)
gfx.shader_uniform("u_resolution", { usagi.GAME_W, usagi.GAME_H })
-- ... your normal gfx.* calls ...
endCross-platform shader files. Desktop GL targets compile GLSL #version 330.
GLES targets, the web build and the Linux ARM (Raspberry Pi) build, use GLSL ES
#version 100 (WebGL 1 / GLES 2). Include two files alongside each other to
support both:
shaders/<name>.fs: desktop, #version 330, in/out, texture(...),
custom out vec4 finalColor.shaders/<name>_es.fs: GLES, #version 100, precision mediump float;,
varying, texture2D(...), gl_FragColor output.GLES targets prefer _es.fs and fall back to .fs; desktop GL is the reverse.
If only one is included, every platform that loads it runs that one, so ship the
_es.fs variant if you want Raspberry Pi and web support. The fragTexCoord,
fragColor, and texture0 inputs are provided by raylib on both targets. See
examples/shader/ for a runnable CRT effect plus a Game Boy palette swap with
both variants of each.
Live reload. Saving the active shader's .fs or .vs file rebuilds it
in-place. Cached uniforms are replayed onto the new shader. Compile errors print
to the terminal and keep the previous shader live.
Bundling. usagi export walks shaders/ and includes every .fs / .vs
in the bundle, so shaders work the same in usagi dev, usagi run, .usagi
files, and fused exes on every platform.
Captures don't include the shader. F8 / Cmd+F screenshots and F9 / Cmd+G GIF recording read the unshaded game render target, so post-process effects show up on screen but not in the saved file. Tradeoff: the shader runs at window resolution (CRT scanlines look smooth, not blocky) and captures stay at the game's 320x180 grid for clean shareable artifacts. If you need the shader baked into a capture, use your OS's screen recorder or screenshot tool against the game window.
Shaders resources:
Sequence-style APIs (gfx.spr) are 1-based to match Lua conventions
(ipairs, t[1], string.sub). gfx.spr(1, ...) draws the top-left sprite.
Palette constants are 1-based too: gfx.COLOR_BLACK is 1, gfx.COLOR_RED is
9. Pico-8's familiar 0..15 numbering is shifted up by one across the board
so slot indices double as Lua array indices. Slot 0 and any index above the
active palette's length render as a magenta sentinel.
Lua's math.random is available as-is. Lua auto-seeds its PRNG at startup, so
each run of usagi dev / usagi run (and each launch of an exported binary)
produces a fresh sequence. No engine call is needed before calling
math.random().
local n = math.random(1, 100)   -- integer in [1, 100]
local f = math.random()         -- float in [0, 1)
If you want a deterministic sequence (replays, tests, repeatable level
generation) call stock Lua's math.randomseed(n) from _init. See
examples/rng.lua
for a small demo.
Check out
./examples/pico8
to see how you can drop in a pico8.lua, require "pico8", and have a lot of
the same functions as Pico-8.
The Pico-8 shim allows you to write code like in Pico-8:
-- check for input
if btn(0) then
  State.p.x = State.p.x - State.p.spd * dt
end

-- draw a sprite from sprites.png
spr(0, 20, 30)dev.settings.json and applies before the first frame on the next launch. No Lua
or _config surface by design; the player owns this setting._update is skipped but _draw still
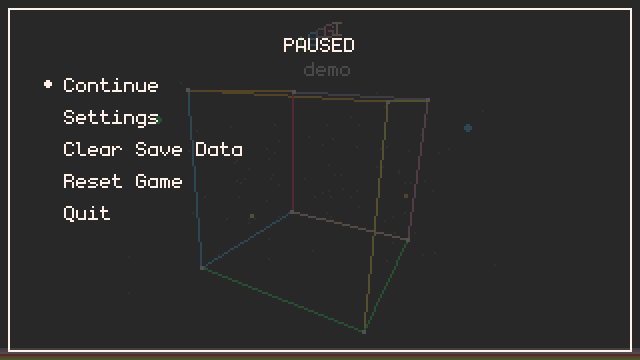
runs each frame, with the pause overlay rendered on top. Music pauses on menu
open and resumes on close.<game>-YYYYMMDD-HHMMSS.gif (where <game> is the short
form of your _config().game_id, e.g.
~/Downloads/snake-20260101-120000.gif). Upscaled 2x (640×360) so they read
well when embedded online. Rolling buffer: trigger the save after the cool
moment, not before. Per-frame timing reflects real frame dt clamped to a 30fps
floor, so a game that stutters produces a GIF that plays at the same pace as
the game ran.0.0 and the
values stored in settings.json (both music and sfx default to 1.0 on first
boot, then track whatever the player set via the pause menu). Settings live in
the same per-game OS data dir as save.json; on web they're routed through
localStorage under usagi.settings.<game_id>.All Lua code chunks re-execute on save, so any top-level local bindings get
re-bound on auto reload. A local State at module scope would get reset to a
fresh table on every save and obliterate the running game; it has to be a
global. The pattern:
State,
assigned only inside _init. _init runs once at startup and on
Reset, so the table outlives reloads. Saved edits keep your
in-progress game intact.local. Re-binding to the same value each reload
is harmless.local Foo = require("foo"), or a
capitalized global Foo = require("foo") if you want Foo reachable from
every file without re-requiring. Both work; the global form is convenient for
engine-wide tables like Player, Enemy.General advice: if you want something to persist across the live reload, put it
into State. If you're tuning something and want to see it change
automatically, leave it inline.
The .luarc.json from usagi init enables the lowercase-global diagnostic to
catch the most common footgun: forgetting local and accidentally creating a
global named score, timer, etc. Capitalize anything you actually mean to
make global; lowercase top-level assignments will warn.
See
examples/hello_usagi.lua
and
examples/input.lua
for some examples.
Usagi watches the running script file and re-executes it when you save. The new
_update and _draw take effect on the next frame. Your current game state can
be preserved across the reload so you can tweak logic mid-play without
losing progress.
_init() is not called on a save-triggered live reload.Press F5 (or Ctrl+R / Cmd+R) for a hard reset. The pause menu's
Reset Game item does the same thing. Reset re-runs _init() so anything you
build there starts from scratch, while leaving the rest of the session alone.
What a reset clears:
State and any other globals you assign in _init, since _init re-runs.effect.flash, effect.screen_shake,
effect.hitstop, effect.slow_mo. Cleared before _init runs so a fresh
game can register new ones.usagi.menu_item registrations from Lua. Re-register them inside _init if
you use them.What a reset leaves alone:
usagi.elapsed keeps counting from session start. Track your own counter from
_init for a per-run timer._init if you want silence on
reset.sprites.png, sfx, music)._init. The VM itself is not torn down, so file-scope
locals and globals you assign elsewhere persist across reset unless _init
overwrites them.You can also make use of usagi.IS_DEV to set up your State on a reset to
keep you within a given scene or setup you want to refine quickly.
View the examples on Codeberg.
There are a variety of examples exercising the full Usagi API that you can browse and adapt. Their source is all public domain, so do with them what you want.
Bomberfrog: Alpha is a finished shoot-em-up made with Usagi that you can reference or use as a starting point for your own game. It includes scene switching, dev-only functionality, score tracking, and more.
SokoWorld is a Sokoban puzzle game made with Usagi with custom level parsing code, scene switching, and save data tracking.
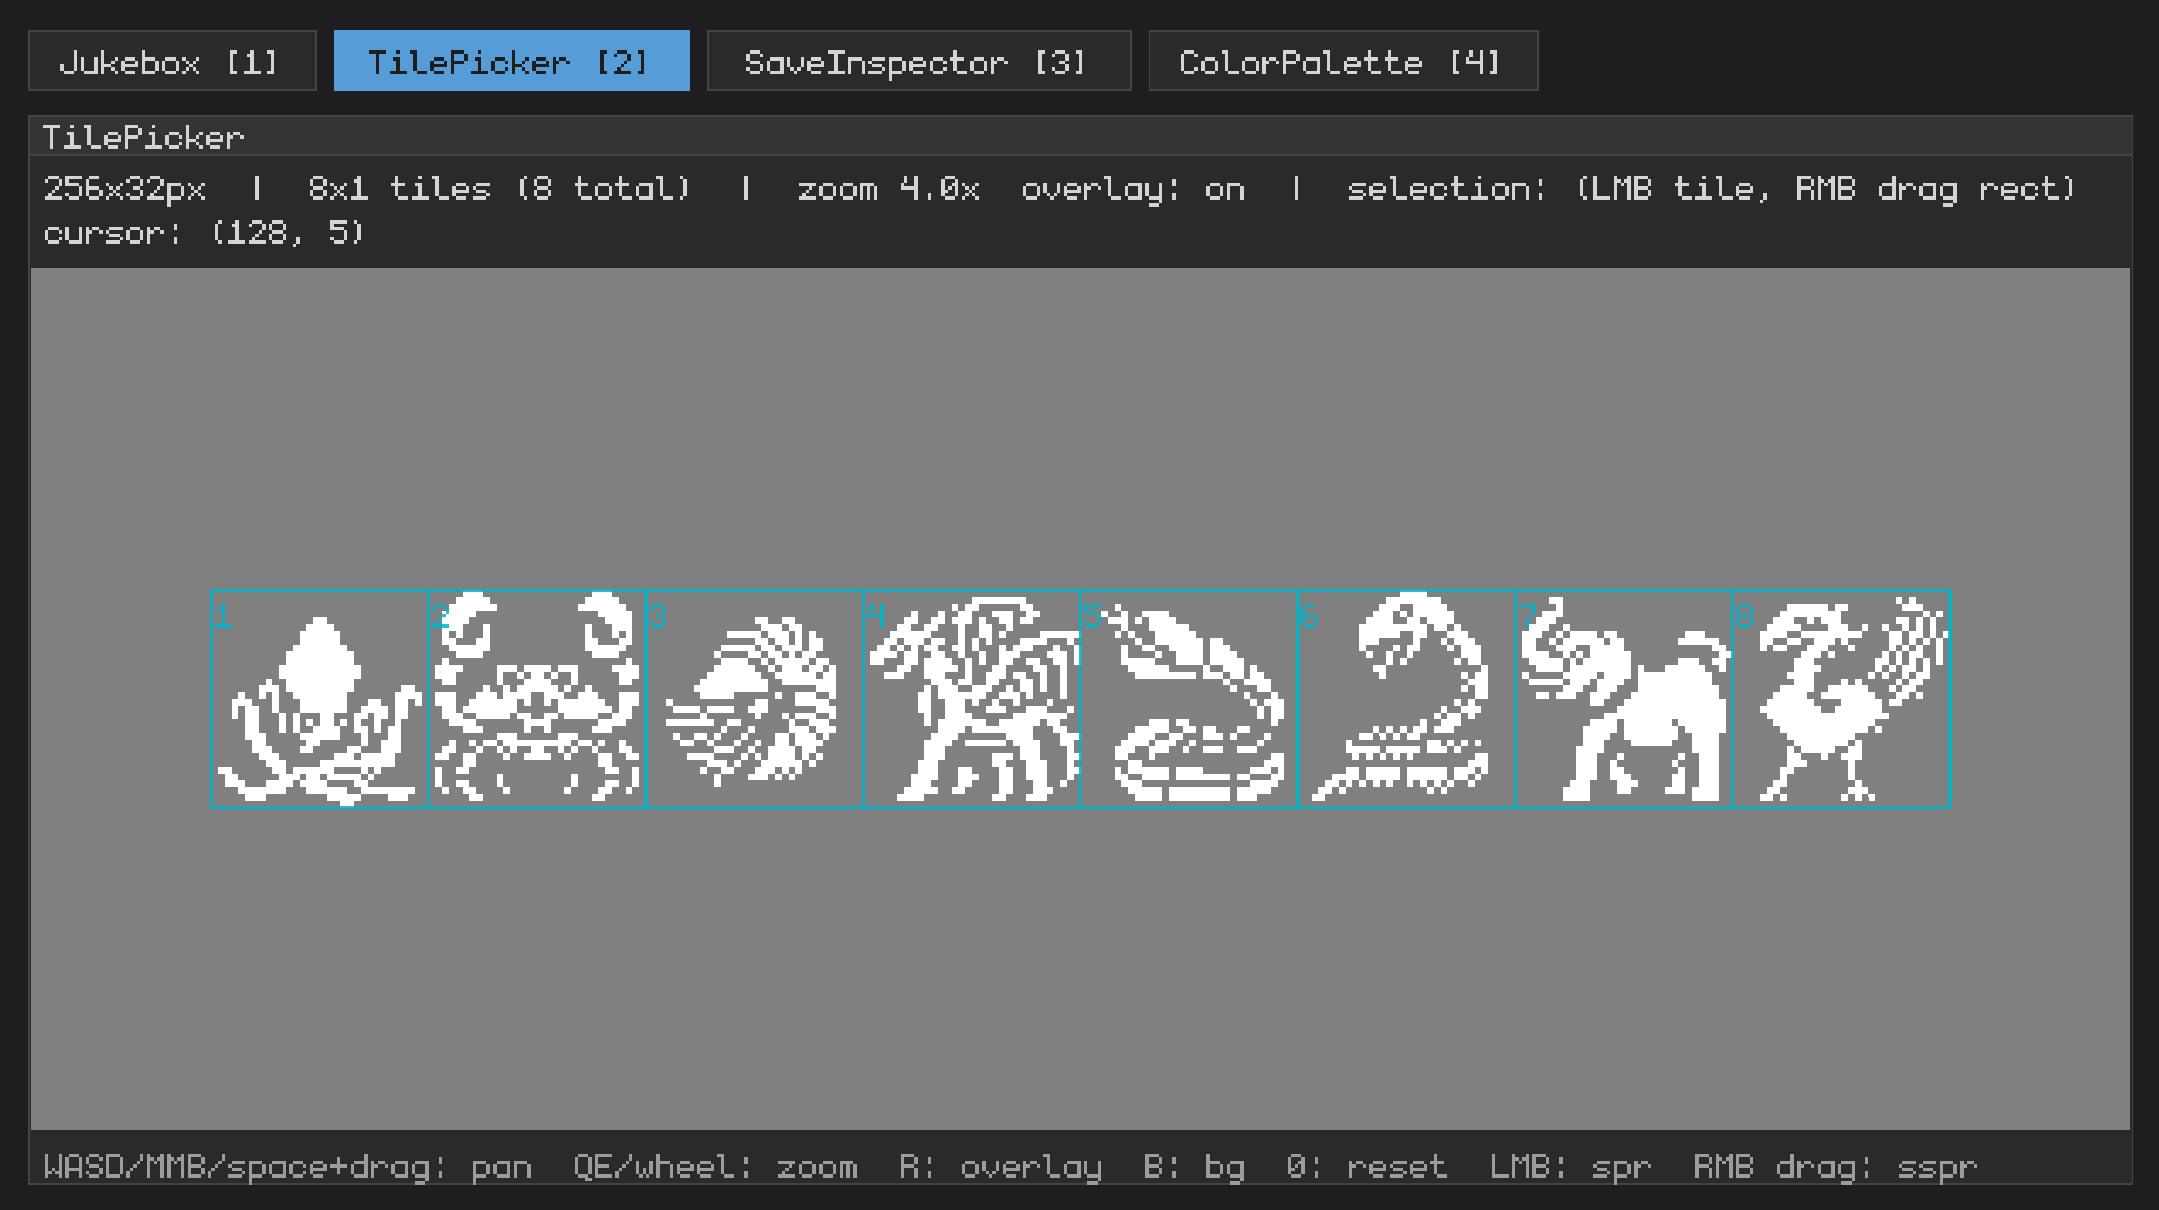
usagi tools [path] opens a 1280×720 window with a tab bar for the available
tools. The path is optional; pass a project directory (or a .lua file) to load
its sprites.png and sfx/ assets. Without a path the tools open with empty
state.
Switch tools via the tab buttons or with 1 (Jukebox), 2 (TilePicker), 3 (SaveInspector), 4 (ColorPalette).
Jukebox and TilePicker live-reload their assets: drop a new WAV in sfx/ or
save a new sprites.png and the tools pick it up on the next frame.
Lists every .wav in <project>/sfx/ and lets you audition them. Selected
sounds play automatically on selection change (Pico-8 SFX editor style), so you
can just arrow through the list to hear each one.
Shows <project>/sprites.png with a 1-based grid overlay matching gfx.spr.
Click a tile to copy its index, or right-drag to grab a rectangle for sspr.
The current selection is shown in the header and highlighted on the sheet.
spr index.sx,sy,sw,sh ready to paste into gfx.sspr(...). Drag direction doesn't
matter; the rect is normalized and clamped to the sheet.Reads the project's _config().game_id and shows the current save.json
contents alongside the resolved file path. Useful for debugging save formats and
inspecting state between runs without leaving the editor.
usagi.load() returns nil.xdg-open on Linux, open on macOS, explorer on Windows).Shows swatches for each of the 16 default colors or your custom palette.png
with the ability to click to copy the Lua value to your clipboard.
Usagi doesn't include a sprite editor, sound effect generator, or music tracker. You can find assets to use on opengameart.org and itch.io or make your own. Here are some tools worth checking out that work well with Usagi:
usagi export <path> packages a game for distribution. Default output is every
platform plus a portable bundle:
$ usagi export examples/snake
$ tree export
export
├── snake-linux.zip          # Linux x86_64 fused exe
├── snake-linux-aarch64.zip  # Linux arm64 fused exe (Pi, ARM SBCs, ARM handhelds)
├── snake-macos.zip          # macOS universal (Apple Silicon + Intel) fused exe
├── snake-windows.zip        # Windows x86_64 fused exe
├── snake-web.zip            # web export: index.html + usagi.{js,wasm} + game.usagi
└── snake.usagi              # portable bundle (usagi run snake.usagi)
Or pick one with --target:
$ usagi export examples/snake --target web
$ usagi export examples/snake --target windows
$ usagi export examples/snake --target bundleExported .app bundles are unsigned, so the first launch is gated by
Gatekeeper: players right-click the app and choose Open (otherwise macOS says
it's damaged or from an unidentified developer). It's a one-time step per
download.
macOS may also prompt for microphone access on launch. That's the audio engine initializing Core Audio, not usagi reading the mic (it never does). Players can click Don't Allow and sound still works.
Non-host platforms come from "runtime templates" published alongside each Usagi
release. The CLI fetches them on first use, caches them per-OS, and verifies
each archive against its sha256 sidecar before extracting.
~/.cache/usagi/templates/, macOS
~/Library/Caches/com.usagiengine.usagi/templates/, Windows
%LOCALAPPDATA%\usagiengine\usagi\cache\templates\.usagi templates list, usagi templates clear.--no-cache.USAGI_TEMPLATE_BASE to override the default GitHub
Releases base URL.The host platform always works offline. Linux x86_64 running
usagi export --target linux (or the linux slice of --target all) fuses
against the running binary directly: no cache lookup, no network. First-time
cross-platform export needs network; subsequent runs are offline.
Override the template source explicitly:
--template-path PATH/TO/usagi-<ver>-<os>.{tar.gz|zip} to point at a local
archive. Skips verification and the cache.--template-url https://example.com/usagi-... to fetch from an arbitrary URL.
Verification still runs (the URL must have a sibling .sha256).Usagi publishes binaries for Linux x86_64, Linux aarch64, macOS universal (Apple Silicon and Intel), Windows x86_64, and web (wasm). If you're on a platform outside that set (FreeBSD, etc.) the official downloads won't work, but you can build the engine from source and export games for yourself:
Grab the source for the release you want. Either clone the repo and
git checkout v<version> or download the source archive from the
release page.
Build with cargo build --release. See
DEVELOPING.md for platform prerequisites
(Windows in particular needs vcpkg + zlib).
Use the resulting binary at target/release/usagi to develop and export:
target/release/usagi export path/to/gameOn a host outside the published set, usagi export (default --target all)
also produces a host-fuse zip named <slug>-<os>-<arch>.zip alongside the four
published-platform zips. Use --target host if you want only that zip without
fetching the cross-platform templates.
The host zip only runs on the same OS/arch you built on; to ship to multiple unsupported platforms, build the engine on each one.
The web export ships a default HTML page that hosts the canvas. To use a custom
page, drop a shell.html next to your main.lua and usagi export picks it up
automatically. Override per-build with --web-shell PATH.
<name>.exe). The web zip is unzip-and-serve.<name> is the project directory name (or the script's stem for flat .lua
files). -o <path> overrides the output location._init()..usagi file is the same bundle bytes
without the footer; it runs on any platform via usagi run.When a project outgrows Usagi (you want iOS / Android, four action buttons, the full Love2D module surface), there's a one-shot port path to Love2D 11.5.
usagi loveify path/to/your-game path/to/your-game-love
cd path/to/your-game-love
love .
usagi loveify walks the source dir, rewrites compound-assignment operators
(x += 1 → x = x + (1)) for LuaJIT compat, copies all assets verbatim, and
drops in the Love shim runtime: usagi_shim.lua (~1800 lines of pure Lua that
reimplements gfx.*, input.*, sfx.*, music.*, usagi.*, util.*,
effect.*, and the custom font.png + palette.png paths against Love's APIs)
plus a conf.lua (suppresses Love's default 800×600 window so your
_config().game_width / game_height apply at boot). If your source has no
custom font.png, the engine's bundled monogram font drops in too so gfx.text
renders crisply out of the box. Refuses to overwrite an existing destination.
This is meant to be a one-time operation. After porting, your game has
"graduated" from Usagi: you keep your gameplay code, but you own the shim file
and the project layout, and future changes happen in your fork, not by
re-running loveify. Edit the shim, gut it, replace it with idiomatic Love
code, take it whatever direction your game needs.
Use cases the port unlocks:
love.graphics.What's intentionally not carried over. You reimplement these in your fork:
usagi.menu_item / clear_menu_items). The Lua calls are
no-op stubs in the shim so a project that registers items doesn't fail to
load, but no overlay renders.usagi tools).
Roll your own remap UI on top of the shim's default bindings.gfx.shader_set / gfx.shader_uniform). No-op stubs. Use Love's
native shader API directly (love.graphics.newShader and friends).love.timer.getFPS() and gfx.text.usagi tools, usagi export, usagi font bake. Usagi CLI, not runtime
APIs. Use Love's own packaging (love --fused,
love-release,
makelove).Web export with a loveified project is unverified. Love 11.5 doesn't ship a web
target. You'd run the port through
love.js or whatever the current best
fork is. The shim has no web-specific code (it doesn't use threading or other
modules that break under emscripten), so in theory it should work, but it hasn't
been tested. Use usagi export --target web if web is the primary need.
The shim source is well-commented pure Lua at <your-project>/usagi_shim.lua.
When you usagi loveify, it's now your code! Open it, read it, edit it. The
original canonical copy lives in
examples/loveify/
in the Usagi repo. Updates to the shim ship with new Usagi releases; once you've
ported, you're on your own copy and that's the intended outcome. You can keep
using the Usagi API if you want, extend it, or move away from it. It's totally
up to you.
With live reload, the fastest debugging loop is usually print. Drop a print
into _update or _draw with the value you care about, save, and watch it tick
in the terminal while the game keeps running.
For tables, stock print(my_table) shows something like table: 0x55a... which
isn't useful. Use usagi.dump(t) to get a recursive pretty-print of any value:
print(usagi.dump(state))Tables are recursed with sorted keys; arrays render in order; cycles show as
<cycle>; functions / userdata / threads show as placeholders. The result is a
string, so you can also draw it on screen during dev with gfx.text.
Other Lua tools worth knowing:
print(debug.traceback()) writes the current call stack to stdout. Useful for
"how did we get here?" questions.assert(cond, msg) raises an error when cond is falsy. A cheap way to guard
invariants: assert(player, "player is nil in _update").error(msg) raises an error directly. In usagi dev it propagates to the
in-game error overlay (the red screen with the traceback), so you can stop the
world when state is clearly wrong rather than chase a quiet corruption several
frames later.pcall(fn, ...) calls fn and returns false, msg instead of unwinding when
it errors. Use it around code that might fail (parsing optional data, loading
from a fragile source) when the rest of the game should keep running.A small amount of defensive programming pays off well in Lua. The language is
dynamic and silent: a typo turns a real value into nil, and you find out
several frames downstream when something unrelated tries to index that nil.
Asserting your assumptions, especially in _init and at function boundaries,
collapses that distance: the failure points at the real bug instead of at the
chain reaction it caused.
USAGI_VERBOSE=1)Set USAGI_VERBOSE=1 in your shell to turn on two extra streams:
_init: build
profile (debug / release), platform, Lua GC params, resolution, sprite size,
whether the pause menu / a custom palette / a custom font are in use, the
script path, and Lua heap size after _init. Useful to paste into bug
reports.avg / p50 / p99 / max ms), the count of frames over the
16.7 ms budget, and the current Lua heap in KB. Designed to catch the class of
regression where everything still runs but slower (e.g. a GC tuning slip-up
that turned 16 ms frames into 43 ms frames silently).Raylib's own boot chatter (GL info, audio device, gamepad detection) and its
per-frame TEXTURE log are gated separately on USAGI_RAYLIB_VERBOSE=1. Kept
distinct so the diagnostics stream doesn't get buried under raylib's per-frame
output. Set both when you need everything:
USAGI_VERBOSE=1 USAGI_RAYLIB_VERBOSE=1 usagi dev path/to/gameExample output for a healthy 60 FPS game:
[usagi] -- startup snapshot --
[usagi] build release on linux
[usagi] gc inc pause=250 stepmul=200 stepsize=11200
[usagi] resolution 320x180 pixel-perfect=off sprite-size=16
[usagi] pause-menu=on palette=pico-8 font=bundled
[usagi] script=examples/hello_usagi.lua lua-heap-after-init=80 KB
[usagi] -- end startup snapshot --
[usagi] frame avg 16.67ms (p50 16.67 / p99 16.67 / max 16.67); over-budget 0/61; lua heap 164 KB
A regression of the "still runs but slower" shape would show:
[usagi] frame avg 43.21ms (p50 43.00 / p99 48.10 / max 51.20); over-budget 61/61; lua heap 12 KBavg jumped 2-3×, over-budget is at the cap, and lua heap is pinned near
zero (the GC is sweeping every allocation, so nothing survives the frame).
examples/diagnostics is purpose-built for this: short-lived table allocs in
_update with controls to scale the rate, plus a burst button. Run it as
USAGI_VERBOSE=1 just example diagnostics and watch the terminal.
Output is zero overhead when the env var is not set: the formatting macros short-circuit before touching the format args.
Set NO_COLOR=1 (any value, presence is what's checked) to suppress the ANSI
color escapes on usagi's own log lines. Useful when piping output to a file or
a CI log viewer that doesn't render ANSI cleanly. Usagi follows the
no-color.org convention and also auto-disables color
when stdout/stderr isn't a terminal, so most pipe / redirect cases are already
covered without setting anything. PowerShell honors the same env var; set it for
the current session with $env:NO_COLOR = "1", or persistently via
[Environment]::SetEnvironmentVariable("NO_COLOR", "1", "User"). cmd uses
set NO_COLOR=1.
just run - run hello_usagi examplejust ok - run all checksjust fmt - format Rust codejust serve-web - build and serve the web build at http://localhost:3535
(requires emcc on PATH; see docs/web-build.md)Download the Usagi Engine logo assets if you need them for any reason.
Usagi is built with Rust.
Raylib and the sola-raylib Rust bindings — Usagi is powered by Raylib, which does so much of the heavy lifting, from handling input to rendering to sound.
mlua — the Rust bindings for Lua are essential for Usagi to work.
monogram-extended — the bundled font (assets/monogram.png, a single PNG
with glyph metadata in a zTXt chunk) used by gfx.text (when no custom font
is dropped in) and by all engine UI overlays (FPS, error overlay, pause menu,
tools window). 5×7 pixel font, ~500 glyphs covering Basic Latin, Latin-1,
Latin Extended-A, partial Greek, and partial Cyrillic. By
datagoblin, released under Creative
Commons Zero (CC0). Source TTF lives at assets/monogram-extended.ttf; to
rebake, run
cargo run -- font bake assets/monogram-extended.ttf 15 --out assets/monogram.png.
Silver — used by the examples/custom_font demo to showcase the custom
font drop-in (font.png at the project root). A 5×9-ish pixel font with broad
European + partial CJK coverage by Poppy Works
(poppyworks.itch.io/silver), licensed
under
Creative Commons Attribution 4.0.
FreeType — used by usagi font bake to rasterize TTF/OTF outlines into
monochrome bitmaps with TrueType bytecode hinting (so ttfautohint-hinted
pixel fonts render correctly at their design size). Vendored and statically
linked via the freetype-rs crate's bundled feature; no system install
required at user-side. Licensed under the FreeType License (BSD-style).
The full list of every transitive Rust crate Usagi depends on, with each
license's text, lives at
usagiengine.com/third-parties (also
bundled in every release archive as THIRD_PARTY_LICENSES.md next to the
binary). Regenerate with just licenses after touching dependencies; CI fails
if it drifts.
Usagi's source code is dedicated to the public domain. You can see the full details in UNLICENSE.